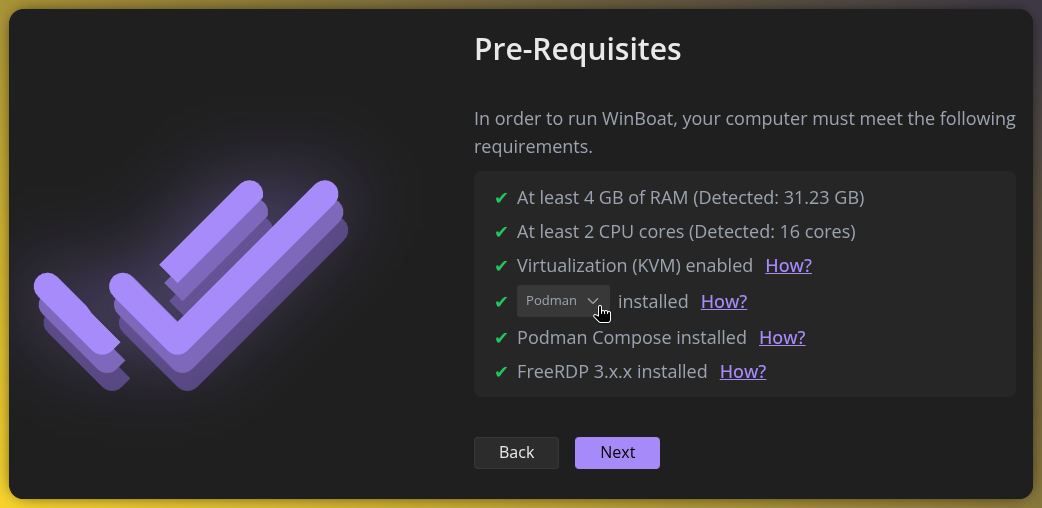
¶ Pre-Requisites
- At least 4 GB of RAM
- At least 2 CPU cores
- Virtualization enabled in the BIOS
- Podman and Podman Compose
- FreeRDP
¶ How to enable virtualization in the BIOS
During startup, press the designated key for your motherboard brand to enter the BIOS (consult your motherboard manual if unsure):
Delete, F10, F1, F2, etc.
Common BIOS Setting Names for Intel:
- Intel Virtualization Technology
- Intel VT-x / Intel VT
- Intel (VMX) Virtualization Technology
Common BIOS Setting Names for AMD:
- SVM Mode (Secure Virtual Machine)
- AMD Virtualization
- AMD-V
| Brand | Navigation Path in BIOS | Setting Name |
|---|---|---|
| ASUS | Advanced Mode (F7) > Advanced > CPU Configuration | Intel Virtualization Technology / SVM Mode |
| MSI | Overclocking / OC > CPU Features / Advanced CPU Configuration | Intel Virtualization Tech / SVM Mode |
| Gigabyte | Tweaker / M.I.T. > Advanced CPU Core Settings | Intel Virtualization Technology / SVM Mode |
| HP | Configuration / System Configuration | Virtualization Technology |
| Dell | Settings > Virtualization Support | Virtualization |
| Lenovo | Security > Virtualization | Intel Virtualization Technology / AMD-V |
¶ Install and Setup Podman
Install Podman from the PikaOS Repository.
pikman i podman podman-compose aardvark-dns
¶ Install FreeRDP
Install Stable via Flatpak.
flatpak install com.freerdp.FreeRDP
Install Experimental via Nightly FreeRDP Repository
If you dont want to use a flatpak follow the FreeRDP instructions on how to add the repository and installation.
¶ Download and Install Winboat
Download the .deb file from the official Winboat website.
https://winboat.app/
¶ Install the package
Run the installer (adapt the filename below to match your downloaded version):
pikman i ~/Downloads/winboat-0.9.0-amd64.deb
¶ Open winboat
Open the newly installed Winboat with your appmenu and start the configuration.
¶ Check the Pre-Requisites
Toggle the docker checkmark to podman
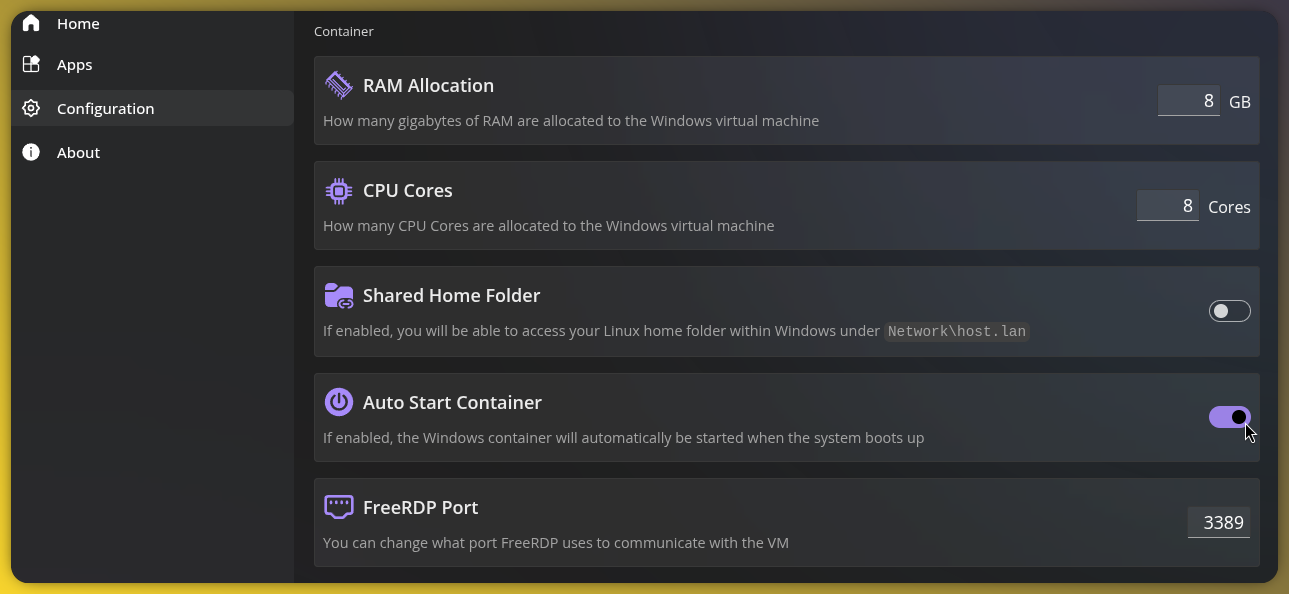
¶ After Installing Windows
- Open Winboat.
- Go to the Configuration menu on the left side.
- Set FreeRDP Port to 3389
¶ System Performance Impact:
Please note that Podman and Winboat are configured to start automatically when your system boots.
Because Winboat runs a virtualized environment inside a background container, this autostart behavior can increase system boot times and consume notable CPU and RAM resources right after startup.
If you experience performance degradation on lower-end systems, consider configuring Winboat to run only on demand.
¶ Disable Winboat Container Autostart
To prevent the Windows environment itself from launching automatically in the background when the system starts, change the toggle inside the application settings:
- Open Winboat.
- Go to the Configuration menu on the left side.
- Turn off the Auto Start Container toggle.
- Press save